14 minutes
Manually sending payments to team members
Hubstaff offers manual payment as an alternative to our automatic payments feature. This offers you the flexibility to pay for your team’s work anytime.
Starter and Grow plans have limited payroll payment options, while Team plans and up have advanced functionality. To upgrade, click here.
Paying for hours
The Pay for hours feature can only be used to pay team members that are not enabled for timesheet approvals.
Step 1
To pay users manually in Hubstaff, go to Financials > Create payments section and click on the Pay for hours tab.

Step 2
Customize the date range and filter to specific projects or users that you’d like to pay. You can select dates for up to 30 days.

If you are required to pay for more than a month’s payment, you can stagger the payments into monthly periods.
You should see the Rate, Regular hours, and Overtime for each team member. You can filter the payments by member or project (4). Hit Apply filters for these changes to take effect. After you hit Apply, you can edit the user’s pay rate by pressing the Edit Pay Rate button.

Step 3
Then click on the Create Payment (5) button. After clicking the Create Payment button, a new window will pop up, and you’ll be able to confirm the payment amount, organization, and the users that are included in the payment. Once this is done, click on Mark as paid to continue.

Step 4
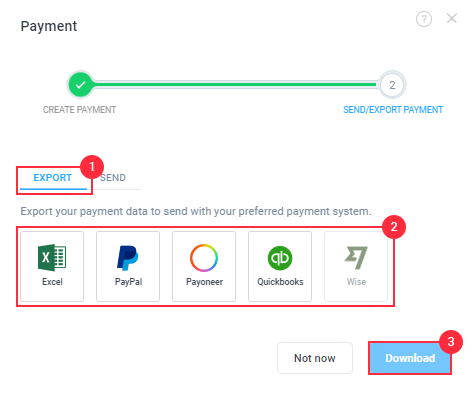
Next, choose the payment gateway that you want to use for this payment and click Send Payment.

Paying Approved timesheets
Step 1
Navigate to Financials > Create payments.
Step 2
Click on the APPROVED TIMESHEETS tab, select the date range, and members to pay, and click on “Apply“. You should see the Current Rate, Regular Hours, and Overtime for each team member. You can also edit the user’s pay rate by clicking on “Actions” Edit Pay Rate button, or pay by clicking on Pay. 
Step 3
To process the payment, click on the Pay (9) button, and a new Payment window will appear. There, you’ll be able to confirm the payment amount, organization, and the users that are included in the payment. Once this is done, click on Mark as paid to continue. 
Step 4
Next, choose the payment gateway that you want to use for this payment and click Send Payment.
One-time amount payments
If you’d like to make payments for anything outside your employee’s work hours, you can use our One-time payment feature. This sends a payment to your employee and keeps a record of the payment on the Financials > Past payments section.
Step 1
Navigate to Financials > Create payments.
Step 2
Click on the ONE-TIME AMOUNT tab.

Step 3
Choose from either Manual (to choose members manually), or the Import CSV option (to bulk upload email addresses and amounts).

Manual

Import CSV

Step 4
On the new window, click on Create payment.

Step 5
Finally, select the payment gateway to initiate the payment and click Send Payment.
Step 6
If you don’t have your payroll set up, you’ll be taken to the Export dialog where you can export payments through a CSV file. This means that no actual payments will be sent through Hubstaff.