39 minutes
How can I add, delete or edit time manually?
This video is divided into chapters, to skip directly to the section for Adding and removing time, click here
It is possible to add, delete or edit time manually in Hubstaff via Daily and Weekly Timesheets as well as the Calendar.
Members with time tracking disabled cannot add, edit, or delete time entries, even if Modify time is enabled.
Note that users can always delete their own time entries unless their time tracking is disabled.
When you delete time entries, screenshots and activity levels are permanently removed from the server and cannot be restored. Please exercise caution when deleting activities. You can add time entries manually when time was deleted by mistake.
Manual time entries added over existing time entries will overwrite them. This will remove any previously captured activity. Hubstaff will warn you before the changes are saved. Once you overwrite existing time entries, the time log is NOT recoverable.
To do this, please follow the instructions on this page.
Adding time manually for daily Timesheets
Step 1
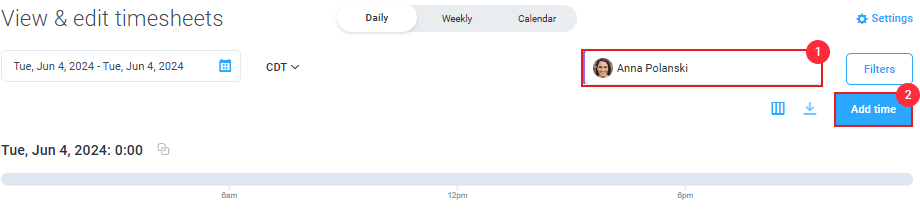
First, navigate to the Timesheets > View & edit section from the main menu.

Step 2
Select the user’s name whose time you wish to edit from the drop-down menu. Then click Add time.
Step 3
A pop-up window will appear allowing you to enter the details of the manual time entry. Here, you can input a new time entry or change the project where the time is tracked to.
Optional: You can choose a To-do/Job available based on the Project/Word Order selected. Additionally, you can enable the billable check if you plan to bill this time on an invoice.
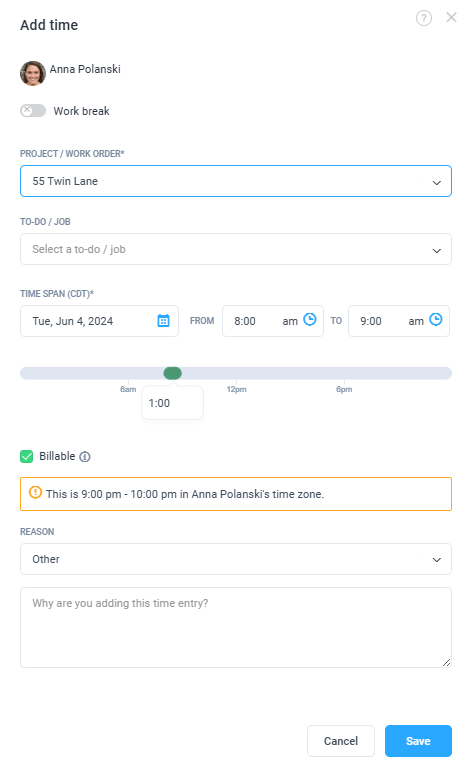
Click Save to commit the entry to your timesheet.
If a time entry overlaps with another entry, then the time within the overlap will be associated with the project/task on the new time entry.
When manual time approvals are enabled, timesheet additions and edits require approval before they are added to your timesheet. Please get in touch with your organization owner/manager for approval.
Step 4
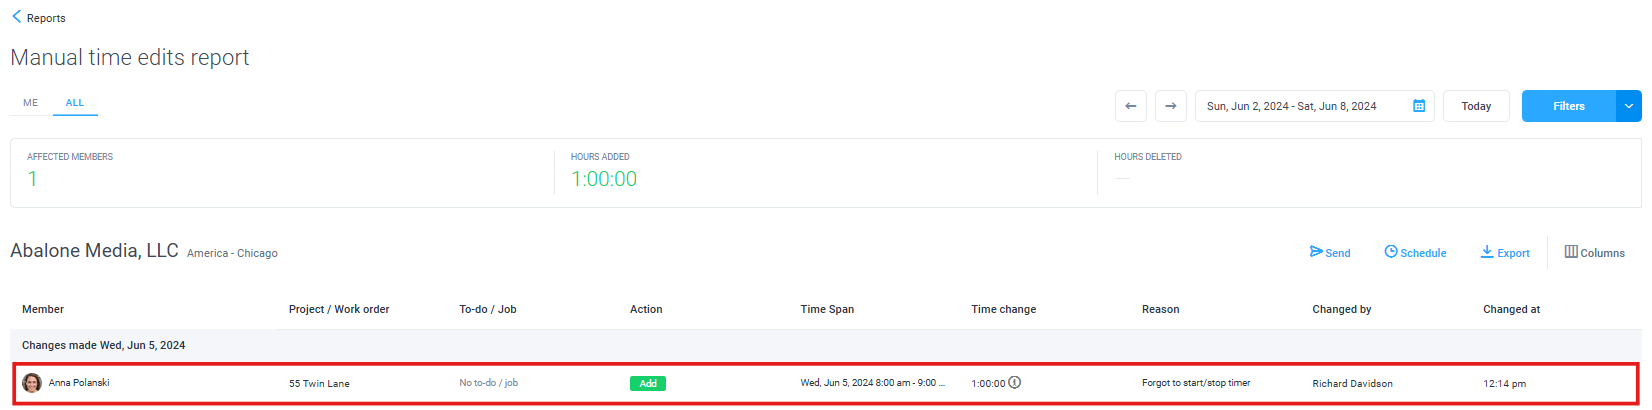
Your time entry will now appear on your timesheets, activity, and reports as shown below:
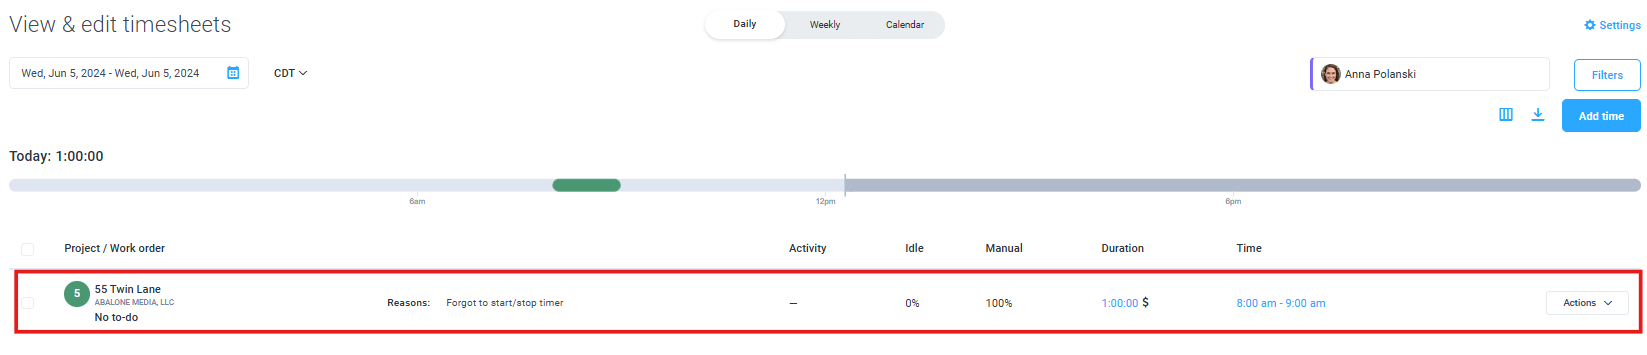
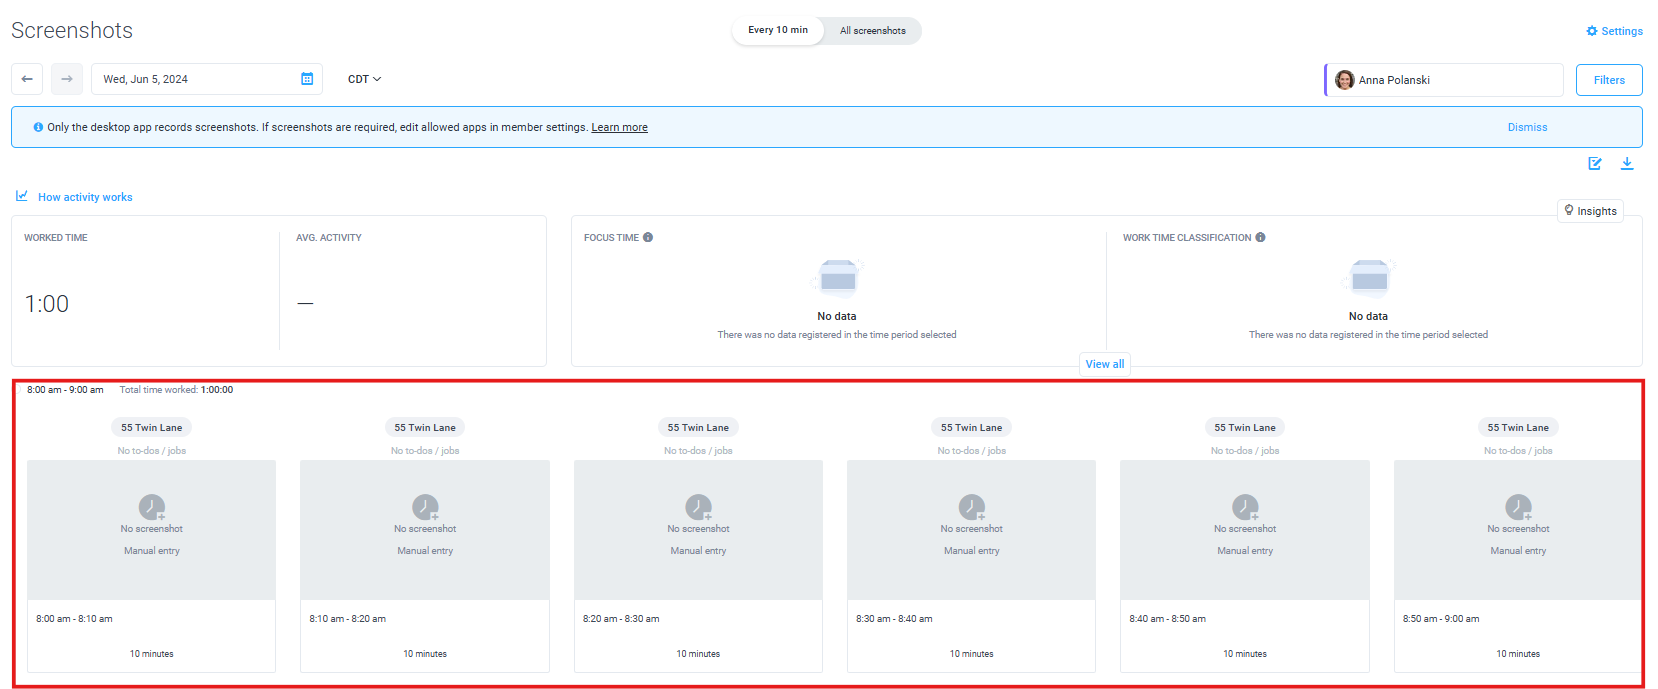
- Time added manually will always be recorded with 0% activity
- Notes are displayed on this report as well
Organization owners and managers (when enabled) can add manual time beyond the set user limits.
Once an org owner/manager adds time above set weekly/daily user limits, they will receive a notification letting them know that the time they are attempting to add will cause users to go above the limit.

Deleting, editing, and splitting time manually for Daily Timesheets
Step 1
You can delete, edit, and split a time entry via the Daily Timesheets page. First, navigate to the Timesheets > View & edit section from the main menu.
Step 2
Select the user’s name whose time you wish to edit from the drop-down menu. Click on the Actions menu next to the relevant time span. Select the appropriate action from the drop-down list.
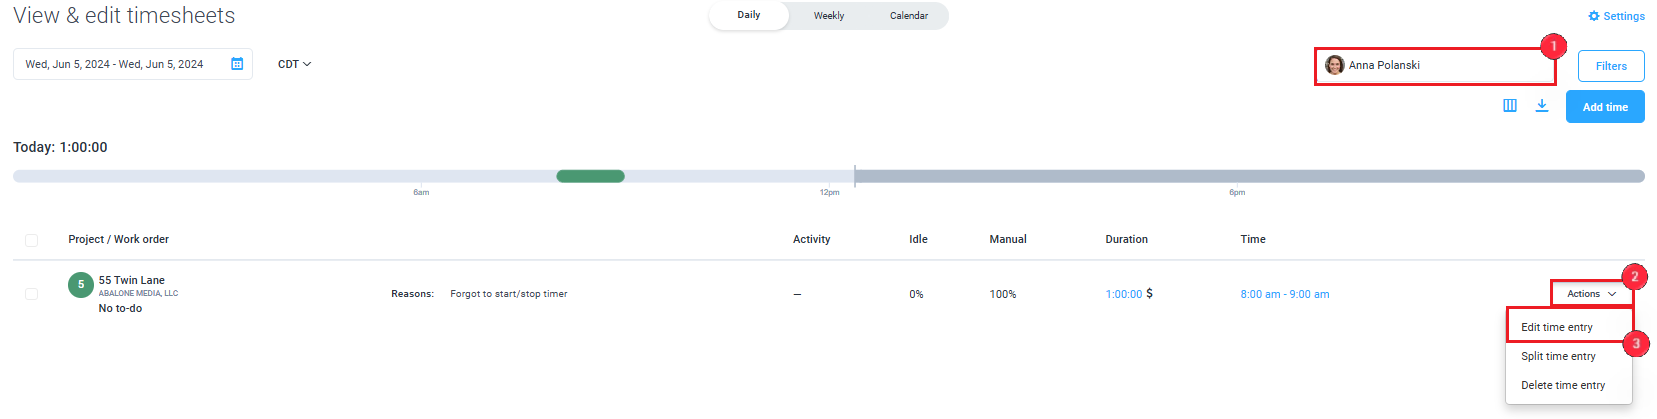
Alternatively, you can also click on either the duration (1) or time span (2) column links to edit the time from directly within the window.

Step 3
You will see the following options:
Edit a time entry
Editing time allows you to extend or shorten the time span of a pre-existing entry, or change the project or To-do it belongs to. Simply select the Project or To-do (1), and assign the new time span (2). Click Save to confirm the changes.

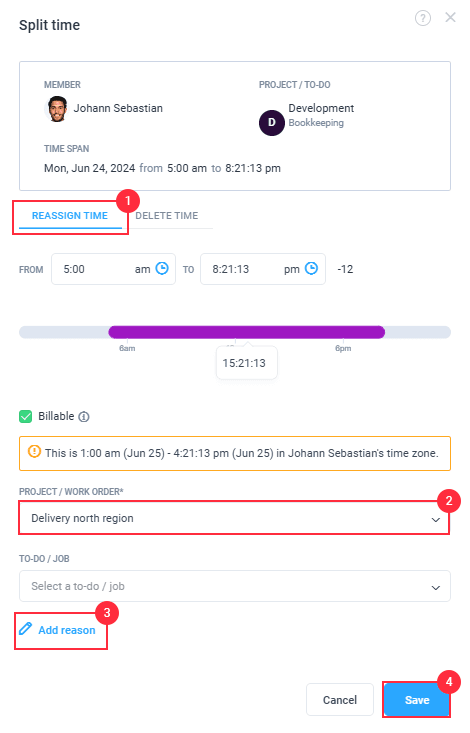
Split a time entry
Splitting time lets you move or delete part of an existing entry to a different time or date. You can also change the project or To-do assigned to the tracked time using this option. Simply select Reassign time (1), select the time span, and select the relevant Project or To-do (2), click Add reason (3) to give some context, Click Save to confirm the changes.
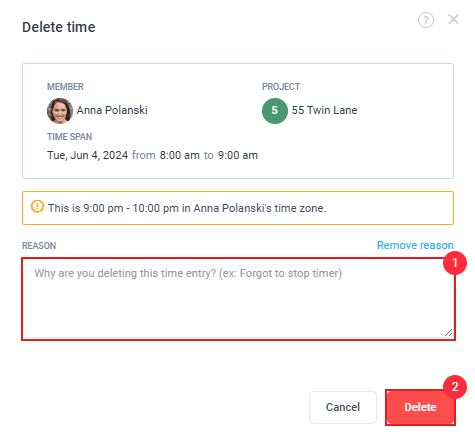
Delete time entry
This option will delete the entire time period. Note that once you delete the time, you cannot restore it. Press Delete to confirm the changes.
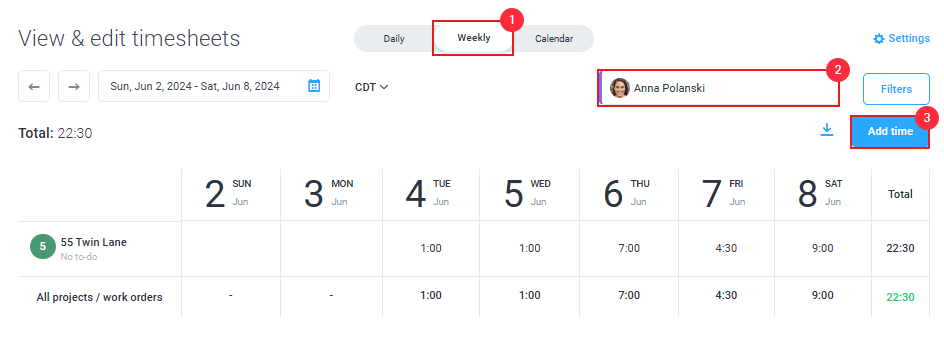
Adding time manually for Weekly Timesheets
Step 1
First, navigate to the Timesheets > View & edit section from the main menu.
Step 2
Select Weekly, select the user’s name whose time you wish to edit from the drop-down menu, and then click Add time.
Step 3
A pop-up window will appear allowing you to enter the details of the manual time entry. Here, you can input a new time entry or change the project to which the time was tracked.
Optional: You can choose a To-do/Job available based on the Project/Word Order selected. Additionally, you can enable the billable check if you plan to bill this time on an invoice.
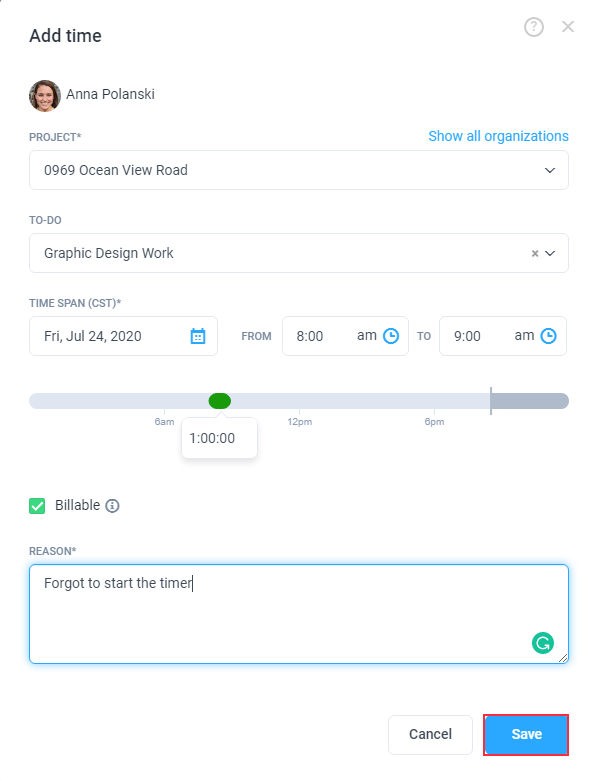
Click Save to commit the entry to your timesheet.
If a time entry overlaps with another entry, then the time within the overlap will be associated with the project/task on the new time entry.
When manual time approvals are enabled, timesheet additions and edits require approval before they are added to your timesheet. Please get in touch with your organization owner/manager for approval.
Step 4
Your time entry will now appear on your timesheets and reports as per below:
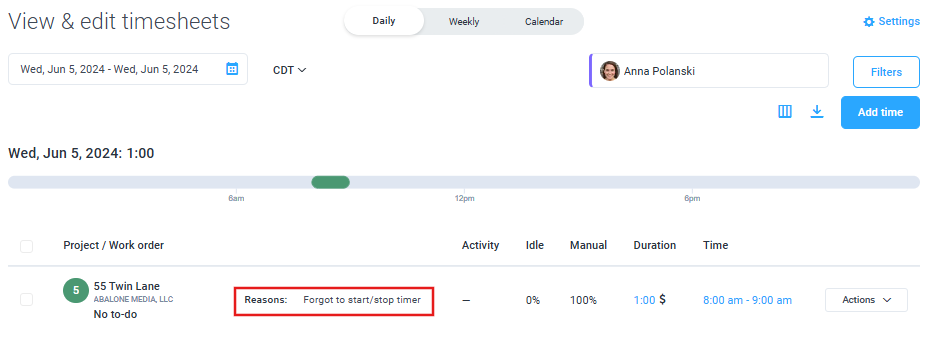
- Time added manually will always be recorded with 0% activity
- Notes are displayed on this report as well
Organization owners and organization managers (when enabled) are allowed to add manual time beyond set user limits.
Once an org owner/manager adds time above set weekly/daily user limits, they will receive a notification letting them know that the time they are attempting to add will cause users to go above the limit.
Deleting, editing, and splitting time manually for Weekly Timesheets
Step 1
You can delete, edit, and split a time entry via the Weekly Timesheets page. First, navigate to the Timesheets > View & edit section from the main menu.
Step 2
Select Weekly (1), select the user’s name whose time you wish to edit from the drop-down menu (2), and click on the block of time you wish to edit (3). A pop-up window will appear showing three icons (4), that can be selected to edit, split, or delete time.
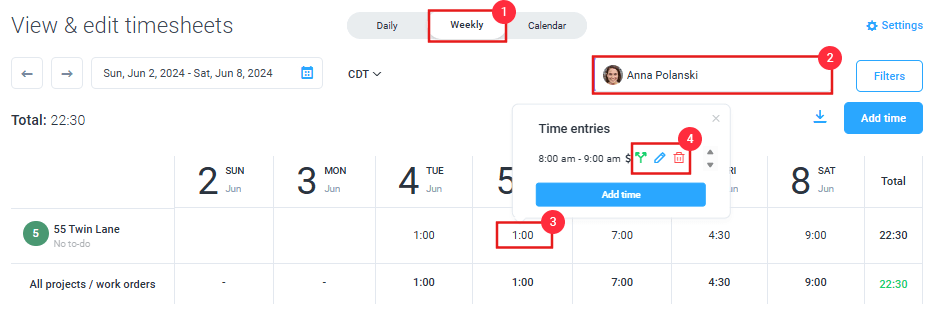
Step 3
We will present you with the following options:
Edit time entry
Click the edit icon to edit the selected time period.
![]()
Editing time allows you to extend or shorten the time span of a pre-existing entry, or change the project or To-do it belongs to. Simply select the Project or To-do (1), and assign the new time span (2). Click Save to confirm the changes.
Split time entry
Click the split icon to split the selected time period.
![]()
Splitting time allows you to move or delete part of an existing entry to another time or date. Additionally, you can change which project or To-do the tracked time belongs to under this option. Simply assign the new time span (1) and select the relevant Project or To-do (2), click Add reason (3) to give some context, Click Save to confirm the changes.
Delete time entry
Click the Delete icon to delete the selected time period.
![]()
This option will delete the entire time period. Note that once you delete the time, you cannot restore it. Press Delete to confirm the changes.
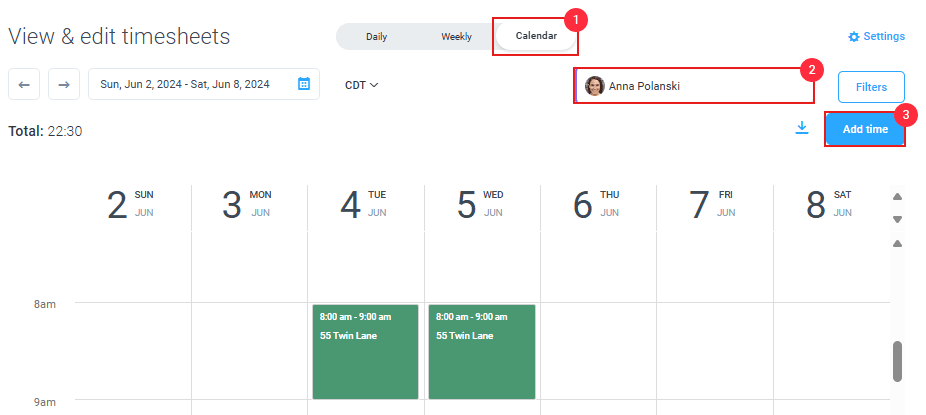
Adding time manually for Calendar Timesheets
Step 1
First, navigate to the Timesheets > View & edit section from the main menu.
Step 2
Select Calendar (1), select the user’s name whose time you wish to edit from the drop-down menu (2), then click Add time (3). Alternatively, you can click on any block on the calendar to add time to it.
Step 3
A pop-up window will appear allowing you to enter the details of the manual time entry. This is where you will input a new time entry or change the project the time was tracked to.
Optional: You can choose a To-do/Job available based on the Project/Word Order selected. Additionally, you can enable the billable check if you plan to bill this time on an invoice.
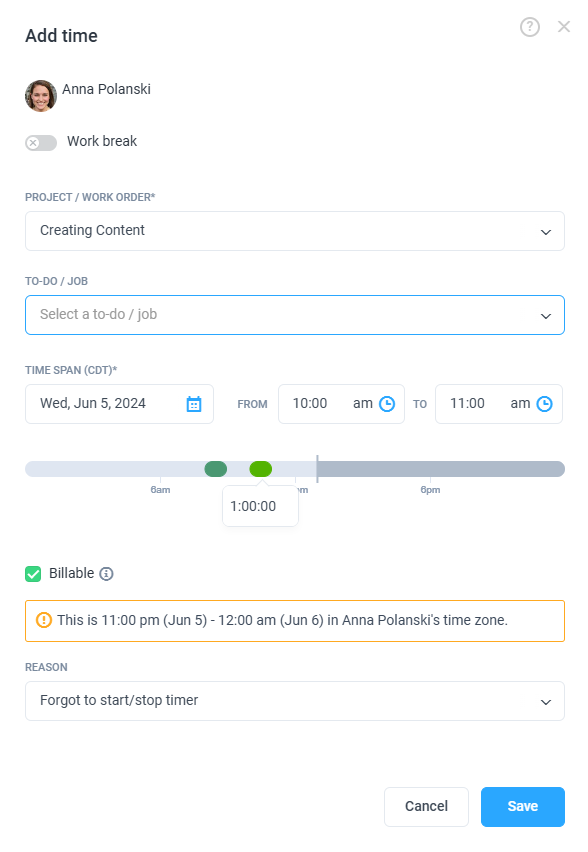
If a time entry overlaps with another entry, then the time within the overlap will be associated with the project/task on the new time entry.
When manual time approvals are enabled, timesheet additions and edits require approval before they are added to your timesheet. Please get in touch with your organization owner/manager for approval.
Click Save to commit the entry to your timesheet.
Step 4
Your time entry will now appear on your timesheets and reports as per below:
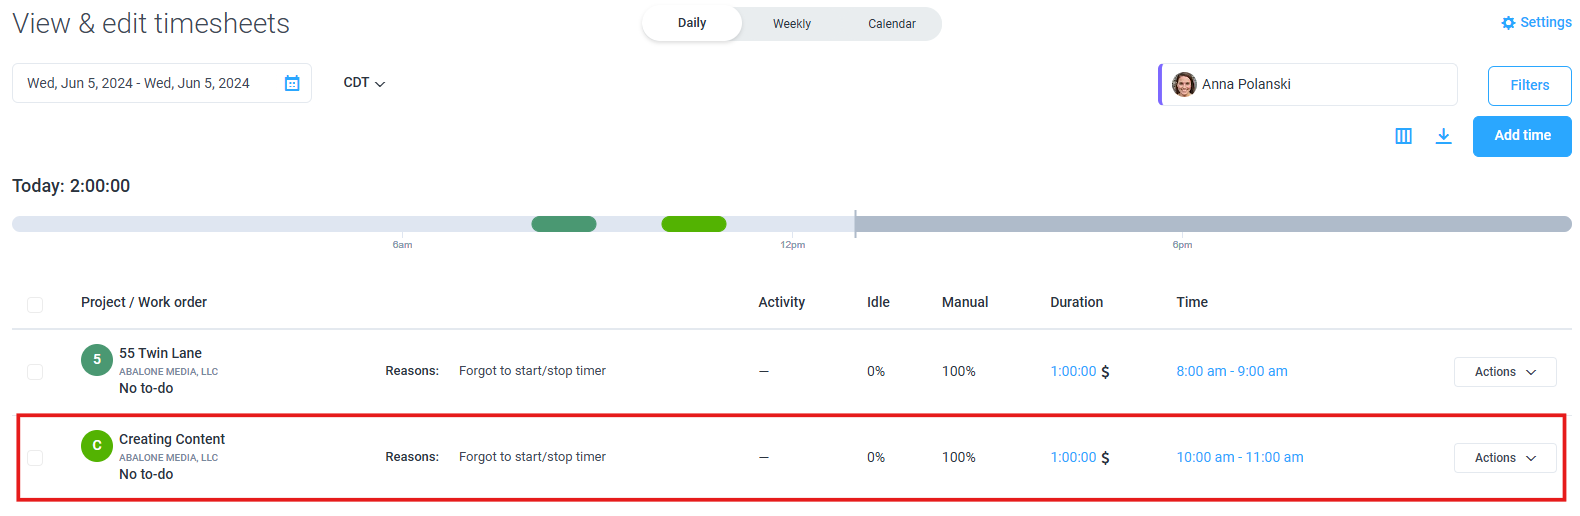
- Time added manually will always be recorded with 0% activity
- Notes are displayed on this report as well
Organization owners and organization managers (when enabled) are allowed to add manual time beyond set user limits.
Once an org owner/manager adds time above set weekly/daily user limits, they will receive a notification letting them know that the time they are attempting to add will cause users to go above the limit.
Deleting, editing, and splitting time manually for Calendar Timesheets
Step 1
You can delete, edit, and split a time entry via the Calendar Timesheets page. First, navigate to the Timesheets > View & edit section from the main menu.
Step 2
Select Calendar (1), the user’s name whose time you wish to edit from the drop-down menu (2), and click on the block of time you wish to edit (3). A pop-up window will appear showing three buttons (4), which can be selected to edit, split, or delete time.
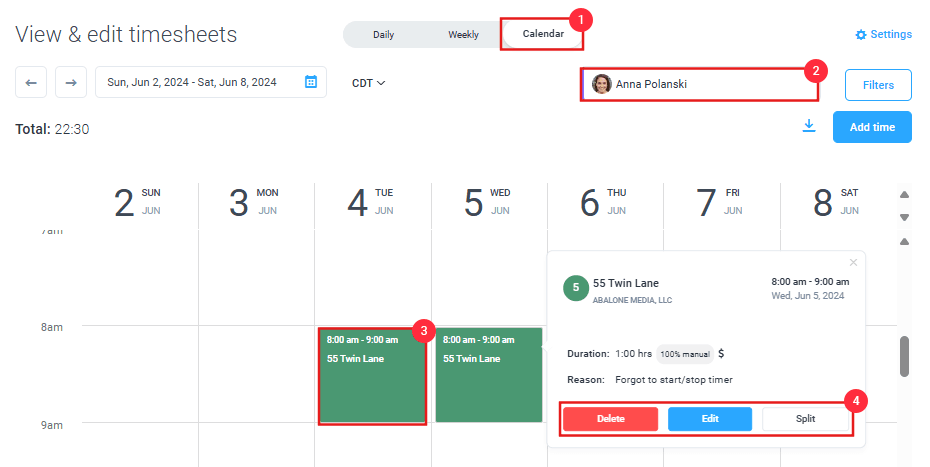
Step 3
We will present you with the following options:
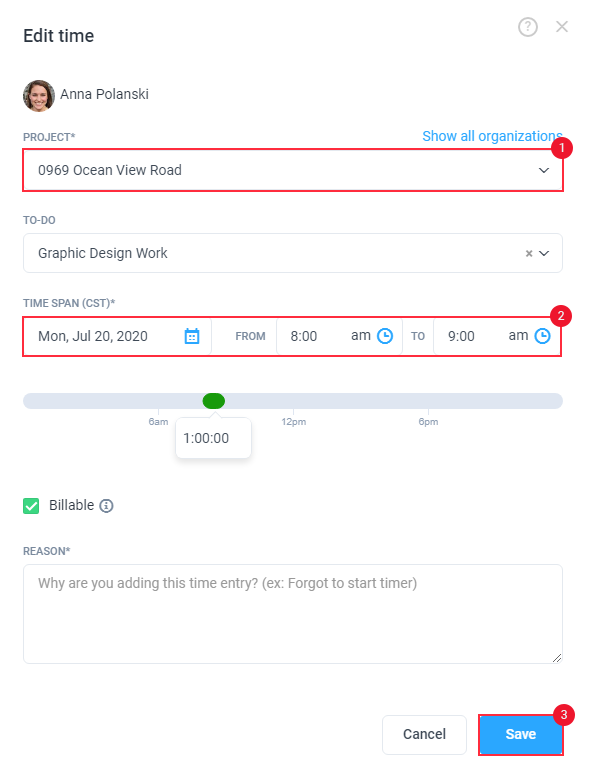
Edit time entry
Click the edit button to edit the selected time period.
![]()
Editing time allows you to extend or shorten the time span of a pre-existing entry, or change the project or To-do it belongs to. Simply select the Project or To-do (1), and assign the new time span (2). Click Save to confirm the changes.
Split time entry
Click the Split icon to split the selected time period.
![]()
Splitting time allows you to move or delete part of an existing entry to another time or date. You can also change which project or To-do the tracked time belongs to under this option. Simply assign the new time span (1) and select the relevant Project or To-do (2). Click Save to confirm the changes.
Delete time entry
Click the Delete button to delete the selected time period.
![]()
This option will delete the entire time period. Note that once you delete the time, you cannot restore it. Press Delete to confirm the changes.
Modify Time Organization Settings
To provide access for team members to add and edit time entries manually (All members are able to delete their own time entries before they are paid, this cannot be turned off), click on Settings (1) from the main navigation bar, then select Activity & Tracking (2) from the drop-down menu. Click on the Timesheets tab (3), then Modify time (4).

Settings can be defined for the entire organization (5) or be enabled only for specific individuals. You can also choose whether your members’ added time will require approval before being added organization-wide or individually.
Manual Time FAQ
Will adding manual time overwrite time logs that currently exist?
Yes. Manual time entries will overwrite any previous manual time or automatic time that was tracked. Hubstaff will warn you before any changes are saved, so be careful to read these notifications. Once you overwrite a time log it CANNOT be recovered.
Can I add time for more than one project in the same time span?
No. Hubstaff will only allow you to work on one project during a given 10-minute interval. Adding time to a different project during the same time span overwrites any pre-existing time that was tracked.
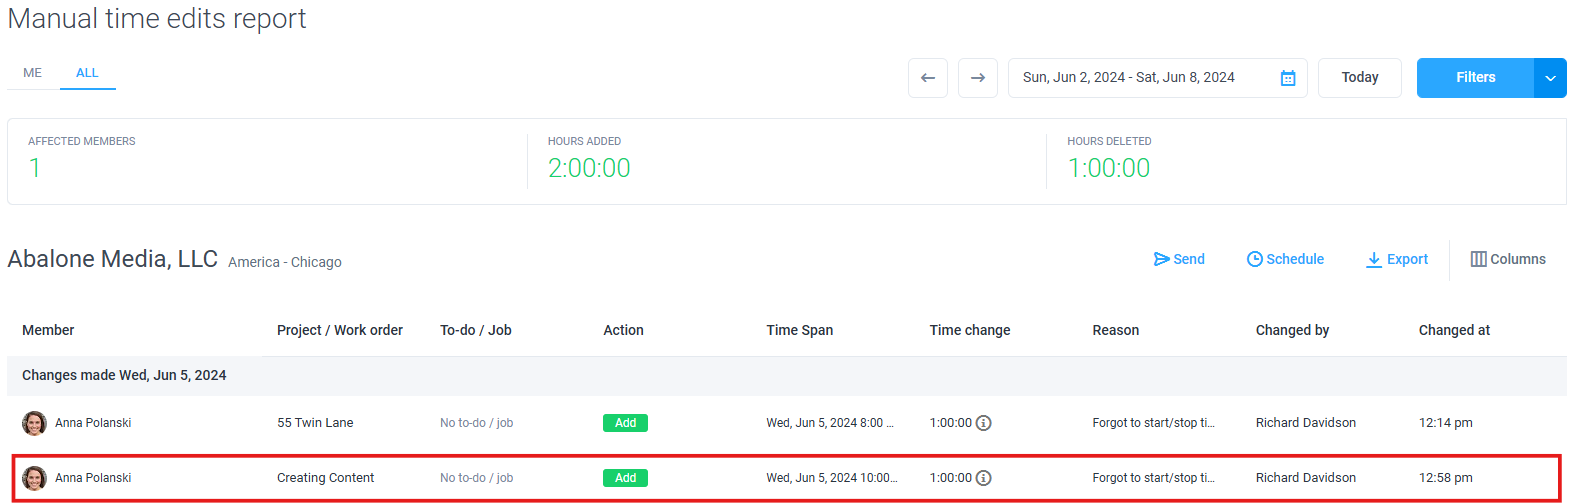
Will manual time appear on the activities and reports page?
Yes. Manual time logs will appear under your activities section and on the manual time report.
Can I add or delete manual time for others?
Yes. Organization owners and managers can add or delete time for others. If you wish to do this, please remember to enable Modify time settings for yourself.
How do I adjust which members of my team can add manual time and which members cannot?
There is a setting called Modify Time in the settings of your main organization. You can adjust those settings there.
Can I add or edit time in second increments?
Yes, you can add/edit time down to the second.
Do I get notified when someone modifies their time manually?
Indeed, we include manual time edits in our daily reports.
Can I add work notes when I add time manually?
Yes, the ‘work note’ on the add time dialog is a convenient way to quickly add a note without having to go to the activities page. If you need to edit a note you need to do that from the Activities page.
Why am I getting an error message saying ‘Please review the warnings and check the boxes to confirm that you want to make these changes’ when adding/editing/deleting time?
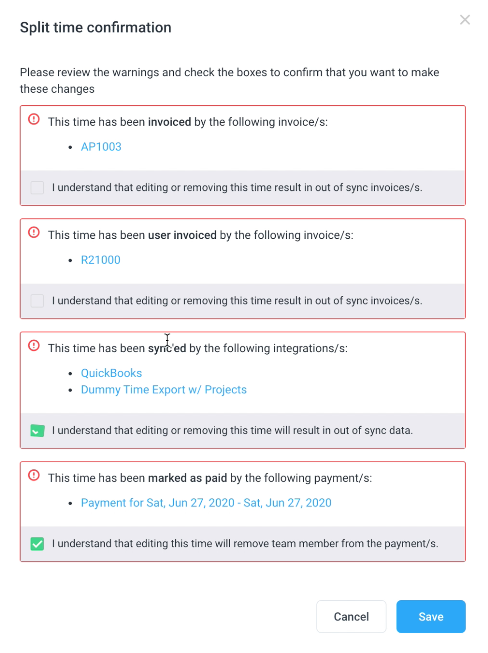
These errors appear when the time the user tracked meets the following criteria:
- Locked time: If you are using an external time tracking platform (Integrations) time is marked as locked. You can learn more about locked time here. When the time is edited, the total hours between Hubstaff and the integrated platform will no longer be in sync.
- Paid time: If you mark the time as paid, either through exported time or payroll, you cannot edit it. Once you edit the paid time, the payment record is removed from the platform.
- Invoiced time: When you invoice the tracked time, editing the invoiced time will change the invoice status to ‘Open.’
- Permissions: Your employer controls the ability to edit time. If you receive an error saying “You do not have permission to edit time”, please contact your employer.
Time formatting guide
Please follow the formatting guide below to correctly input your time entries.
Start/Stop field’s input most common formats:
- 0 = 12:00 AM
- 12 = 12:00 PM
- 13 = 1:00 PM
- 1:05 = 1:05 AM
- 1.15pm = 1:09 PM
- 1.5am = 1:30 AM
- 15.45 = 3:27 PM
- 13pm = 1:00 PM
- 1135 = 11:35 AM
- 2335 = 11:35 PM
Duration most common formats:
- HH:mm, where “HH” is hours and “mm” is minutes.
- Examples
- 18:20
- Examples
- H(.d), where “H” is hours and “(.d)” is a fraction of hours and it’s optional. Alternatively, the separator could be “,”.
- Examples
- 18.5 = 18:30
- 18 = 00:18
- 18,5 = 18:30
- Examples
- Hours and Minutes.
- Hours:
- 1h = 01:00
- 1 h = 01:00
- 1hour = 01:00
- 1 hour = 01:00
- 1hours = 01:00
- 1 hours = 01:00
- Minutes:
- 1 = 00:01
- 1m = 00:01
- 1 m = 00:01
- 1min = 00:01
- 1 min = 00:01
- 1minute = 00:01
- 1 minute = 00:01
- 1minutes = 00:01
- 1 minutes = 00:01
- Hours: