26 minutes
Holidays and Time off Requests in Hubstaff
Hubstaff’s Holidays and time off requests feature allows you to set policies that dictate the time off, leave, or paid holidays your team can take.
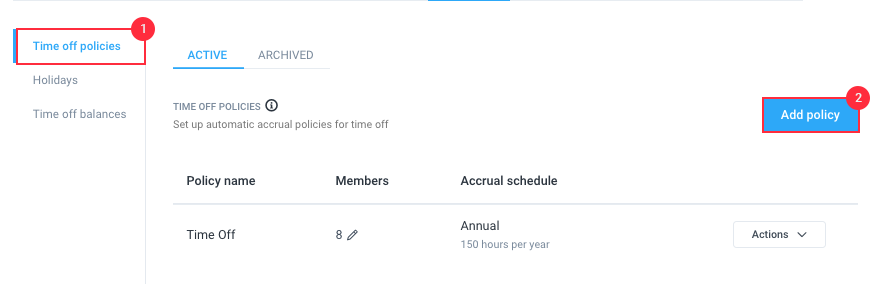
How to add a Time Off policy
Step 1
To add a time off policy, first, you will need to navigate to Settings > Policies > Time Off option on the dashboard.

Step 2
Click on Add a policy.
Step 3
Next, the Add time off policy dialog box will appear. You will be asked to fill in the following information:
- Policy Name
- Schedule of Accrual
- Annual – Balances are added at the start of each year.
- Hours – This allows you to add a custom number of hours of time off earned for every hour each team member worked
- None
- Policy joined date – Balances are added when the member is added to the policy.
- Amount Accrued (Only available on annual accrual policies) – Here you would input a time-off credit balance each team member is eligible to receive at the start of every year.
- Allow negative balances – This enables users to file a time off request even if their credit balance is “0.”
- Requires approval – This requires each pending time off request to be approved by a manager/owner.
- Balance rolls over annually – This enables the remaining balance from the previous year’s time off credits to roll over to the following year.
- Paid – This configures the time-off credits as billable.

Click Next to continue.
Step 4
Next you can choose how you’d like to add members to the new policy.
- List of members – choose from the entire user list.
- Home country and Employment type – choose users based on the country or employment type designated to each user.
- Import CSV – allows you to upload a CSV file containing the list of users.

You can also place a checkmark on Automatically add all new members to this policy if you want all new users to be part of the policy.

Step 5
Hit Save to complete the setup.

Understanding how Time Off accruals work
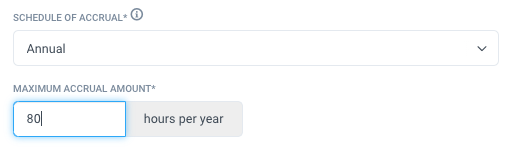
Annual Accrual
You can choose the Annual accrual method to provide your team with a set number of hours available for Time off yearly.
In the below example, an owner wants to provide each user with 10 days off every year. Depending on how many hours each user works daily, you may enter the result of your team member’s total time off days multiplied by their total daily hours.
In the screenshot below, users work 8 hours daily and are being given 10 days of time off per year. The formula would be 8 daily hours X 10 time off days allotment = 80 hours per year.
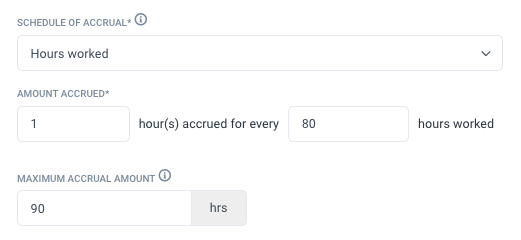
Hours worked Accrual
Organization owners can choose the Hours worked option under the Time Off Schedule of Accrual section to provide a set number of hours each team member earns based on the number of hours they’ve worked.
In the screenshot below, the team member earns 1 hour of Time Off balance for every 80 hours of work, with a limit of 90 hours per year.
Policy Joined Date
Hours are accrued when the member is added to the policy, at a prorated amount for the year. Hours are also accrued on January 1st of every year.
Example: The policy has 20 hours of time off, and John Smith is added on July 20th. He would start with 9 hours on this policy. Total time off / 360 * (days remaining in the year) = time on the policy.

Editing the members assigned to a Time Off policy
Step 1
To edit members assigned to a time off policy, navigate to Settings > Policies > Time Off option on the dashboard.
Step 2
On the Time off policies page, click the Action option beside the policy that you want to edit and click on Edit members.

Step 3
Make the necessary changes in the following screen. Once complete, click Save.

Editing or removing a Time Off policy
Step 1
To edit or remove a Time Off Policy, first from the left-hand side, navigate to Settings > Policies > Time Off > Time Off Policies.
Step 2
Next to the name of the policy you would like to modify, click Actions then select Edit time off, Edit members, Archive or Remove from the drop-down menu. Editing a time off policy will let owners modify all values entered except the schedule of accrual.

How to request time off
Step 1
To request time off, from the left-hand side navigate to Calendar > Time off requests

Step 2
Click on the Request time off button.

Step 3
Next, the Time off request dialog box will appear. You will be asked to fill in the following information:
- Policy – the time off policy where you want to submit the request.
- Date range – the schedule of the time off, can be in hours or a full day.
- Start/End time – “All day (24 hours)” means the user will be out the whole day. That said, this can be unchecked if a specific period needs to be entered in the event a user wants to take a partial day off.
- Upload file (optional) – section to add an attachment if needed.
- Reason– the reason for the leave request.

When requesting time off for multiple days at a time, users can specify how many hours are taken per day for the selected date range.
The “All Day (24 hs)” box is checked by default. If there is a Hubstaff Schedule set, the time off request’s duration will be all day (12:00am – 11:59pm). If the box is unchecked, then users can set the timespan they will be out.
The “Exclude weekends” box is checked by default, this will disable inputs for all weekends within the selected date range and the value will be 0:00 hours. If the box is unchecked, the value will remain 0:00 hours but it’ll be enabled for users to edit.
The “Exclude holidays” box is checked by default, this will disable inputs for all holidays within the selected date range. If the box is unchecked and there is a paid holiday, there will be a label that says “Paid Holiday” next to the date and the hours will be excluded from the time off request. If there is an unpaid holiday, we will show a label that says “Unpaid holiday” and the hours will have a default value of 8:00 hours as it would behave like a regular day on the request.
Managing time off requests
Time offs can be managed on the Calendar > Time off requests page.
Submitted
The default tab is the Submitted tab, where you can see all time off requests pending approval.

You can also filter time off requests using these available options:
Filter by Member/Team:

Filter by Date:

Approved
The approved page shows you all approved time offs. From the Actions menu, you can view, edit, delete or deny time offs.

Denied
The denied page shows you all approved time offs. From the Actions menu, you can view, resubmit, delete or approve time offs.

All
The “All” page shows all existing time off requests.

How to add a Holiday policy
Step 1
To add a new holiday policy, navigate to the Settings > Policies > Time off page on the sidebar menu;
or you can navigate to Calendar > Time off requests > Settings > Holiday Policies.
Step 2
Click on the Holidays section then click on Add holiday.
A dialog box will appear, asking you to add a holiday. Click on the drop-down menu to either enter a custom date, or select from a pre-populated list of Christian, Orthodox Christian, US, or Canadian holidays.

Choosing the Custom option will provide you with additional options:
- Holiday name
- Paid hours
- Holiday date
- Optional – set the holiday to occur annually (Occurs Annually)

Next, you will see this dialog
Add members through:
- List of members – choose from a list of team members to include in the holiday.

- Home country or Employment type – allows you to add users based on their designated country or employment type.

- Import CSV – import a list of users to include in the new holiday policy.


Step 3
Hit Save to save the holiday policy.

How to edit a Holiday policy, edit the members within a policy, and how to remove it
Step 1
Navigate to Calendar > Time off requests > Settings > Holiday Policies.
Step 2
Click on Holidays.
Step 3
Next to the policy name you wish to edit, click on Actions > Edit holiday, Edit members. If you wish to remove the policy, select the necessary action by clicking Actions, and selecting Remove from the drop-down menu.

The way our PTO system works is that accrued hours are collected as time is marked as paid (The time needs to be either paid using the automatic payment or marked as paid). The PTO balance will not show up unless the payment is marked as paid.
Hours worked Accrual is retroactive. Meaning if the user is added to this policy and time was paid afterward even if the pay period is before the join date, it will still accrue time off.